Before you begin: All shades are custom-made to your measurements. Double-check every number. If unsure, professional measuring/installation is recommended.
What this guide covers
 This step-by-step covers the measurements your coach needs for an aftermarket windshield shade system with day/night rollers. You’ll confirm fit across the A-pillars, capture the overall width and drop, decide if you need a flap to clear a dash hump, and note roll direction and mounting style. We also include tips for measuring the driver, passenger, and door openings.
Tools & Supplies
- Steel tape measure (readable to 1/16")
- Masking tape for temporary marks
- Phone or notepad for photos and measurements
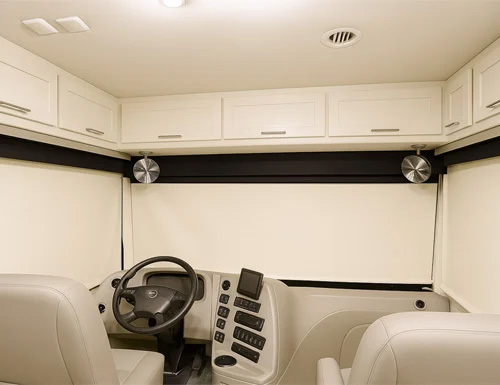
1) Confirm space for a one-piece windshield shade
You need a straight, unobstructed line from the passenger A-pillar to the driver A-pillar. As a rule of thumb, if you can imagine a 2" × 4" board on edge bridging that span without hitting cabinetry, you have the needed space for the roller assembly (approx. 2" high × 4" deep).
If cabinetry or trims intrude, plan an A-pillar modification (e.g., a flat trim board or channel) to create a smooth surface for the shade to roll against.
Pro Tip: We highly recommend ordering a template to ensure your measurements are correct and that it will fit your RV.
2) Measure the overall width
- Place a small masking-tape mark at the front inside edge of each A-pillar where the roller will mount.
- Measure from mark to mark in a straight line. Record to the nearest 1/16". This is your Overall Width.
- Capture 2–3 confirming photos straight-on and from each corner.
3) Measure the drop to the dash
- From your planned mounting line, measure straight down to the top of the flat dash. Record as Overall Drop.
- If the dash has a hump that the shade would contact, you’ll also record a flap height.
4) Determine flap height (if you have a dash hump)
If the dash hump intrudes into the shade path, add a flexible flap to the bottom bar so the shade clears the hump.
- Note where the fabric would first touch the hump; mark that point lightly.
- Measure from that contact point down to the top of the flat dash. Record as Flap Height.
Important: Flap Height is included in Overall Drop, but list it separately on your order form.
5) Choose roll direction & day/night configuration
- Roll direction: Fabric can roll toward the windshield (standard roll: tighter to glass) or toward the cabin (reverse roll: may clear protrusions better). Choose the path that keeps the fabric flat with minimal contact.
- Bottom finish: Specify an enclosed rod or an enclosed rod with flap (when a dash hump is present).
- Mount style: If you are opting for the dual roller, day/night shade, decide whether the day and night rollers are stacked (one in front of the other) or side-by-side within the same assembly based on your space and aesthetics.
6) Plan electrical (powered windshield shade)
Powered windshield shades typically use an ignition-tied safety stop so the shade won’t drop into the driver’s line of sight while driving. Identify a safe route to ignition-switched 12V, avoiding airbags and moving parts. You will need to wire the yellow wire to the ignition power source and the red and black wires to a constant power source. If you’re not comfortable with DC wiring, consult a certified RV tech.
7) Measure driver, passenger & door windows
Driver Window
- Confirm the windshield shade placement won’t obstruct the driver roller at the top.
- For angled windows, measure width at top and bottom and the usable height beneath cabinetry.
- If full coverage isn’t possible due to angles, plan a small blackout insert for 100% privacy.
Passenger Window & Door
- Use a separate shade for the passenger window and a dedicated screen-door pull-up shade for the door so you can enter/exit without raising the main shade.
- Choose day screen (solar) for heat/UV reduction and a separate night shade for privacy if needed.
Measurement Worksheet (save this with photos)
| Field | Your Measurement | Notes |
|---|---|---|
| Overall Width (A-pillar to A-pillar) | ____ in | Record to nearest 1/16" |
| Overall Drop (mount line to flat dash) | ____ in | Vertical only |
| Flap Height (if dash hump present) | ____ in | Included in Overall Drop |
| Roll Direction | Windshield / Cabin | Pick one |
| Day/Night Config | Stacked / Side-by-Side | |
| Bottom Finish | Enclosed Rod / Rod + Flap | |
| Power | Manual / Powered | Note ignition 12V access |
Helpful Tips
- Measure twice. Small errors on custom shades are costly.
- Photograph each measurement and the A-pillar area with covers removed.
- If cabinetry intrudes, a simple flat trim board can create a clean roll path.
- For best performance, opt for a dual roller RV windshield shade which pairs a solar day screen (heat/UV reduction, daytime privacy) with a full blackout night shade.
Next Steps
Ready to order? See our RV Windshield Roller Shades or Day/Night RV Shades.
Production lead time: Custom windshield shades typically require several weeks to build. Verify current lead times at checkout.
Looking for more custom RV shades to match the rest of your windows in your motorhome or RV?


