Getting Started
Each horizontal window blind ordered will include two hinged cover installation brackets (left and right) and the appropriate number of intermediate support brackets for the headrail width. One support bracket is required for widths from 69" to 94", and two support brackets for widths over 95".The sheet metal screws supplied with the brackets will be the only fasteners needed in most cases. Wall anchors(not included) are recommended for non-solid surfaces such as drywall or plaster. Concrete, brick or tile surfaces require carbide drill bits and the appropriate plugs, anchors or screws.
Just a few basic tools are recommended: steel measuring tape, carpenter's level. Power drill and bits, and a flat-blade and/or Phillips screwdriver.
Mounting the Installation Brackets
 Level mounting is critical to the operation of the window blind. A carpenter’s level should be used to check that the mounting surface is level on an inside mount. On an outside mount, the tops of the installation brackets must be level and aligned at the same height.
If you ordered and received the "cornice style" valance, make sure you mount the brackets right at the edge of the window frame. It is best to actually extend the edge of the brackets out 1/8". This allows you to attach the valance to the headrail of the blinds because the "cornice style" valance sits outside the window frame.
Bracket Spacing
Bracket spacing is the same for both inside-mount and outside mounted applications. The two hinged-cover brackets should be positioned 1/4" beyond the ends of the headrail. Horizontal window blinds over 70" wide must have a support bracket spaced evenly between the end brackets. Blinds over 95" wide must have two support brackets spaced no more than 48" apart.Blinds over 96" wide or 114" long require an additional support bracket positioned 7" in from the cordlock or headrail.
All bracket locations should be measured, marked, and the mounting holes drilled.
Inside Mount Applications
Installation brackets for inside mount applications are attached inside the window frame, or the ceiling. Shim the mounting surface if necessary to ensure that the headrail is mounted level.The front edges of the brackets must be aligned. If your valance has returns, make sure you extend the bracket out past the walls edge about 1/8" so the valance can be attached to the headrail correctly.
Support brackets, if required, should be positioned so that they are aligned with the end brackets.
Two screws are used to attach each bracket. Whenever possible with end brackets, one screw should be located on the side and one located at the top, as shown.
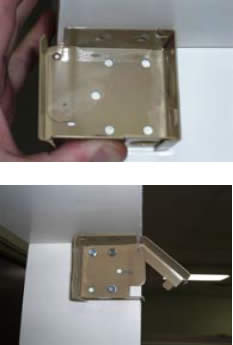
Outside Mount Applications
Installation brackets for outside mount applications are attached to the window frame or wall, or to a door. A flat vertical surface at least 1 3/4" high is required for attachment.The installation brackets must be level and aligned at the same height to ensure level mounting of the headrail. Support brackets, if required, should be positioned so that they are aligned at the same height as the end brackets. Two screws are used to attach each bracket. Locate the screws diagonally, as pictured.
On all horizontal door mounted blinds you must use the provided extension blocks when mounting your blind to the door. The extension blocks fit behind the brackets and help keep the blind slats from rubbing on your door.
Installing the Blind
If no support brackets are used, simply slip the headrail into the end brackets and snap the locking covers shut. The headrail is held securely in place by the locking cover of the end installation brackets. If the blind is loose in the end brackets, open the hinged cover and expand the tabs on the headrail end locks using a screwdriver. If the blind is too tight, compress one or both of the tabs.If support bracket(s) are used, tip the headrail into the support bracket(s) while placing the rail into the end brackets.
Hold Down Brackets/Pins
Hold down brackets are used to prevent the horizontal blind from swaying in the wind, especially on door installations. The hold down brackets are mounted to the wall as shown. The metal pins that protrude from the ends of the bottomrail fit into the holes in the brackets.Wand Attachment -(Wand Tilt Only)
The tilt mechanism inside the headrail has a metal shaft protruding from it that extends beneath the rail. Simply hook the wand through the hole in this shaft. Open and close the slats to test the wand tilter. Six revolutions of the wand should tilt the slats from fully open to fully closed.Valance Attachment
The valance is attached to the headrail using valance clips. Install one clip on each end , and space any others evenly in-between, no more than 48" apart. If the valance is outside mounted, attach the valance returns using the "L" brackets provided ("L" brackets will be plastic on wood & alloy blinds or metal on PVC blinds) . Slots in the valance and the returns help you to easily assemble the returns to the valance piece.Important: Install the valance clips before mounting the headrail
After mounting the headrail, attach the valance directly to the clips.
Care and Cleaning
Regular cleaning with a feather duster or soft, clean cloth is typically all that is needed to keep blinds looking new. Blinds may also be cleaned using a handheld vacuum with a brush attachment using low suction.
...............................
Blinds Chalet, has more than 25 years of experience selling and installing window blinds and window shades. Attractive, high quality, and durable window blinds and window shades fit any energy saving plan, decorating style, and budget. Blinds Chalet window coverings come from manufacturers who use only the highest quality materials and resources, and each is backed by a limited lifetime warranty. For information on what types on energy efficient blinds, blind accessories, and any other window covering needs, visit www.blindschalet.com.


