To install vertical window blinds, please read completely the instructions below before beginning the installation process.
Before beginning installation, review parts list. NOTE that not all parts required for every blind.
PARTS LIST:


....................................
Blinds Chalet has more than 25 years of experience selling and installing vertical window blinds and window shades. Attractive, high quality, and durable window blinds and window shades fit any energy saving plan, decorating style, and budget. Blinds Chalet window coverings come from manufacturers who use only the highest quality materials and resources, and each is backed by a limited lifetime warranty. For information on what types of window blinds, blind accessories, and any other window covering needs, visit www.blindschalet.com.
Before beginning installation, review parts list. NOTE that not all parts required for every blind.
PARTS LIST:
- Headrail
- Vinyl Louvers
- Mounting Clips
- L-Brackets (Wall Mount Vertical Blinds Only)
- Mounting Screws
- Valance (Optional)
- Valance Corners
- Valance Returns
- Valance Clips (With Wall Mount Valances Only) Option
- Cord Weight
- Screwdriver
- Drill w/ 3/32" bit
- Metal Tape Measure
- 1/4" Nut Driver
OUTSIDE/WALL MOUNT FOR VERTICAL BLINDS
- Each headrail section will require a minimum of two L brackets. Using tape measure and pencil, mark bracket locations on wall 2" from each window corner, or 3" from each end of track. Space brackets evenly between the two end brackets.
 Headrail up to 54" -2 Brackets/ Clips,
56" to 90" -3 Brackets/ Clips,
91" to 120" - 4 Brackets/ Clips,
121" to 150" - 5 Brackets/ Clips,
151" to 180" - 6 Brackets/ Clips, - Using tape measure and pencil mark bracket height at each bracket position from Step 1. Bracket Height = Length + 1" for floor Clearance (e.g. 78" x 84" , mount @ 85") Center Sides and Height Over Window Frame.
NOTE: If carpet or tile will be installed later, add allowance for thickness so that louvers will clear carpet/tile. - Position brackets on wall and mark screws holes. Top of bracket should be placed even with height marks from Step 2. Use drill to make pilot holes. Mount brackets using included screws or alternative fasteners
- Headrail should be centered under mounting clips, Insert track into front end of mounting clip and snap into place with rolling motion toward back end of clip. Start with center of headrail and work out toward each end of the headrail.
ATTACHING VALANCE (OPTIONAL)

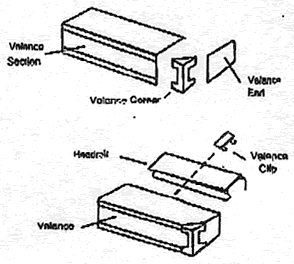
- Valance (Optional) Insert Valance ends into Valance corners, and attach corners to end of valance sections.
- Snap one valance clip onto ends of each headrail section 2" from end. Space the remaining clips evenly. Slide valance sections into clips.
INSIDE/CEILING MOUNT (WITHOUT VALANCE)
- Each headrail will require 2-6 mounting clips (See Section 1 for quantity)
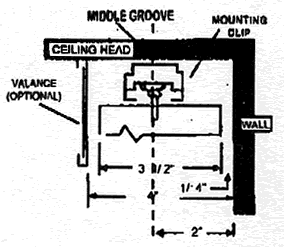
- Measure headrail to allow a ¼" clearance between louver and window. Example 2" for 3 ½ louvers . . . or window casing
- Attach mounting clips to ceiling not more than 30" apart over remainder of track.
- Track should be centered under mounting clips. Insert track into front end of mounting clip and snap into piece with rolling motion to back end of clip.
INSIDE/CEILING MOUNT (WITH VALANCE)

- Mark mounting clip screw locations on valance. Mounting clips should be positioned 2" from the face of valance end 3" from valance ends and spaced evenly between ends.
- Valance must be drilled and positioned between mounting clips and ceiling. Insert screw through mounting clip and valance, than tighten against ceiling or window casing. (Insert track in place as described in Section Above)
- Squeeze at top of cord weight and remove cord ball. Loop blind control cord around the guide on cord ball and re-insert into cord weight.
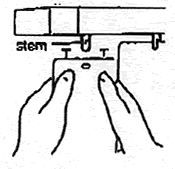
- Rotate stem to open position so you can see through slats. Push louvers up into stems so front louver faces short leg of stem. Gently pull down on louver to insure it catches on stem hook. For cloth louvers all hems should face same direction. Note. Channel Panel Louvers must be installed so that insert material (front of louver) faces the short leg of the stem. Remove louvers by inserting credit card between louver and long end of stem.

WARNING
To avoid possible strangulation, keep cords out of reach of children. Use these devices:- Clamp or clothes pins
- Cleat
- Tie the cord to itself
- Tie-down device
Louver Maintenance
- Vertical Louvers require a muminum of care.
- Cloth: Requires only periodic vacuuming
- Metallic: Clean with damp cloth and a mild detergent
- Vinyl Vertical Window Blinds: Clean with damp cloth and a mild detergent.
- A thin film of detergent left on louvers will eliminate static electricity
....................................
Blinds Chalet has more than 25 years of experience selling and installing vertical window blinds and window shades. Attractive, high quality, and durable window blinds and window shades fit any energy saving plan, decorating style, and budget. Blinds Chalet window coverings come from manufacturers who use only the highest quality materials and resources, and each is backed by a limited lifetime warranty. For information on what types of window blinds, blind accessories, and any other window covering needs, visit www.blindschalet.com.


