Our honeycomb cell shades are made to be either an inside mount or an outside mount, depending on what you desire. A few tools are required to install your blinds.Measuring Tape Battery or Power Drill ¼ Hex head bit or Phillips driver bit
Brackets are provided to hang your shades. For shades 60" or wider use FOUR BRACKETS.
 Optional Hold Down Brackets are mounted with the supplied screws. With the shade at its proper drop, place the pin of each Hold Down into the hole in each End Cap and mark the screw holes. Make sure the pins are level and aligned. Raise the shade, then screw the Hold Down Bracket into the mounting surface. Hold Down brackets are used on doors only. It is an option only and not required for proper operation. It will help hold the blind in place but has to be released to operate the blind up and down.
Continuous cord cell shades and cordless cell shade install the same way, although the bracket looks a little different.
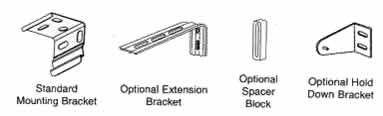
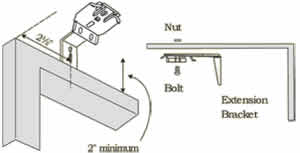 Optional Extension Brackets are used to project the back of the shade up to 2 3/8" from the mounting surface. Attach the Installation Bracket to the Extension Bracket with the nut and bolt provided.
 Shades are shipped with the required number of brackets for proper installation. End brackets should be located to the outside of the cord spools. Depending on the width of the shade, additional brackets may be necessary evenly spaced between the two end brackets.
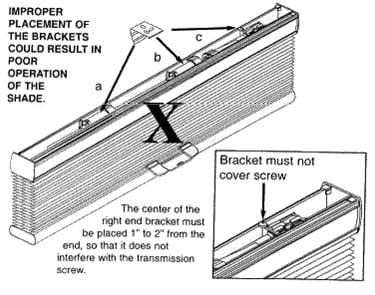 Do Not place installation brackets over the clear plastic spool covers (a & b) or over the transmission screw (c).
Using the Installation Bracket as a template, measure to the edge of the bracket and mark the hole locations with a pencil for drilling. When mounting brackets, make sure they are in line and level.
Brackets must be in line and level. Shim brackets on inside mounts if necessary. The headrail must be level for the shade to operate properly.
Inside or ceiling mounts-Use the top bracket holesWall or outside mounts-use the rear bracket holes. Outside mount with spacer block-Optional Spacer block will project bracket 3/8"
continued on page 2
....................................
Blinds Chalet has more than 25 years of experience selling and installing window shades including honeycomb cell shades. Attractive, high quality, and durable window blinds and window shades fit any energy saving plan, decorating style, and budget. Blinds Chalet window coverings come from manufacturers who use only the highest quality materials and resources, and each is backed by a limited lifetime warranty. For information on what types of window blinds, blind accessories, and any other window covering needs, visit www.blindschalet.com.
Brackets are provided to hang your shades. For shades 60" or wider use FOUR BRACKETS.
How to Install Cell Shades
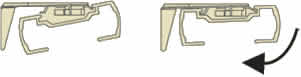
Place the end brackets 2" in from the edge of the window. Using the screws provided place the bracket on the top of your window sill and insert screw through the hole in the bracket and install. Repeat this step as many times as needed for desired number of brackets. With window shade in the closed position insert the back edge of the headrail into the bracket at an angle with the front edge of the headrail tilted down. Now simply push back on the honeycomb cell shade headrail gently while pushing the front edge up towards the bracket. The shade will snap into place, repeat this step for all the brackets. Carefully tug on the heads rail to make sure it is secure. The shade is now operational.Optional Hold Down Brackets are mounted with the supplied screws. With the shade at its proper drop, place the pin of each Hold Down into the hole in each End Cap and mark the screw holes. Make sure the pins are level and aligned. Raise the shade, then screw the Hold Down Bracket into the mounting surface. Hold Down brackets are used on doors only. It is an option only and not required for proper operation. It will help hold the blind in place but has to be released to operate the blind up and down.Continuous cord cell shades and cordless cell shade install the same way, although the bracket looks a little different.
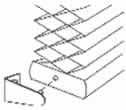
Inside Mount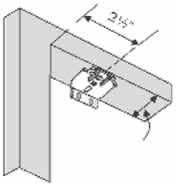 To fully recess the shade requires a flat surface with a minimum depth of 2" for standard rail or 2 5/8 for large rail. Shallow mounting requires " minimum. To fully recess the shade requires a flat surface with a minimum depth of 2" for standard rail or 2 5/8 for large rail. Shallow mounting requires " minimum. | Outside Mount The brackets are mounted with two bugle screws through the back end of the bracket flat against the window molding or the wall above the window. The bracket requires a minimum surface 3/4" high. The brackets are mounted with two bugle screws through the back end of the bracket flat against the window molding or the wall above the window. The bracket requires a minimum surface 3/4" high. |
Optional Extension Brackets
Optional Extension Brackets are used to project the back of the shade up to 2 3/8" from the mounting surface. Attach the Installation Bracket to the Extension Bracket with the nut and bolt provided.Hanging the shade
- Unwind the cord from the shade but keep the rubber band around the shade stack.
- Hold the shade up near the brackets and insert the front clip of the bracket into the front groove of the rail.
- Make sure the shade is centered in the window opening.
- Push the rail back and up until the back clips of the bracket are inserted in the back groove of the rail.
Cordless Installation
Additional fasteners other than those sent with your shade may be required depending on the mounting surface. Wallboard and plaster require the use of anchors such as expansion or toggle bolts. Brick, tile or stone need special plugs and drill bits. Remember to always pre-drill holes in wood to avoid splitting.Bracket Installation
Shades are shipped with the required number of brackets for proper installation. End brackets should be located to the outside of the cord spools. Depending on the width of the shade, additional brackets may be necessary evenly spaced between the two end brackets.| For shade widths of: | Use this Number of brackets: |
| Up to 40" | 2 |
| 40" - 72" | 3 |
| 72" - 84" | 4 |
| 84" and up | 5 |
Do Not place installation brackets over the clear plastic spool covers (a & b) or over the transmission screw (c).Using the Installation Bracket as a template, measure to the edge of the bracket and mark the hole locations with a pencil for drilling. When mounting brackets, make sure they are in line and level.
Brackets must be in line and level. Shim brackets on inside mounts if necessary. The headrail must be level for the shade to operate properly.
Inside or ceiling mounts-Use the top bracket holesWall or outside mounts-use the rear bracket holes. Outside mount with spacer block-Optional Spacer block will project bracket 3/8"
continued on page 2
....................................
Blinds Chalet has more than 25 years of experience selling and installing window shades including honeycomb cell shades. Attractive, high quality, and durable window blinds and window shades fit any energy saving plan, decorating style, and budget. Blinds Chalet window coverings come from manufacturers who use only the highest quality materials and resources, and each is backed by a limited lifetime warranty. For information on what types of window blinds, blind accessories, and any other window covering needs, visit www.blindschalet.com.


