Designed for RV Use, Backed by Real Support
RV owners choose Blinds Chalet because our products are built for how RVs are actually used—not how they look in a showroom.
- Custom-sized for RV window openings and shallow mounting depth
- Options that reduce movement and rattling while driving
- Simple measuring guidance to prevent ordering errors
- Lightweight, durable materials made for everyday use
- Secure packaging and reliable shipping nationwide
- Support from people who understand valances and tight clearances
No one-size-fits-all shortcuts—just RV blinds and shades that fit right, operate smoothly, and hold up.
What Makes Motorhome RV Window Blinds & Shades Different?
RV window blinds and shades are different because RV windows are different.
RVs often have shallow frames, curved walls, tight clearances near latches and valances, and constant vibration on the move. Residential blinds can be too deep, too heavy, or simply not designed to stay secure once the rig starts rolling. Even small issues—like a bracket that loosens—turn into noise, sagging shades, and light gaps.
RV-ready window treatments are chosen to handle:
- Limited mounting depth behind trim
- Road vibration and frequent opening/closing
- Heat, glare, and UV pouring through large panes
- Privacy needs in campgrounds and shared spaces
- Weight and clearance concerns on slide-outs
That’s why many owners prefer day/night pleated shades, roller shades, or lightweight mini blinds, often in cordless styles. The right choice improves temperature control, cuts glare at eye level, and keeps your interior looking finished for the long haul. It also protects upholstery and cabinetry from fading during long sunny drives.
RV Window Blinds & Shades We Offer
We offer RV window blinds and shades that solve the real problems owners deal with—heat, glare, privacy, and fit—without turning shopping into a project.
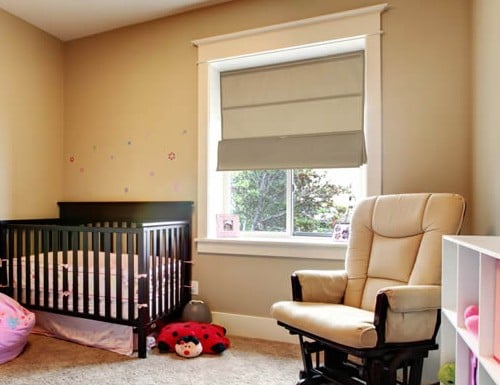
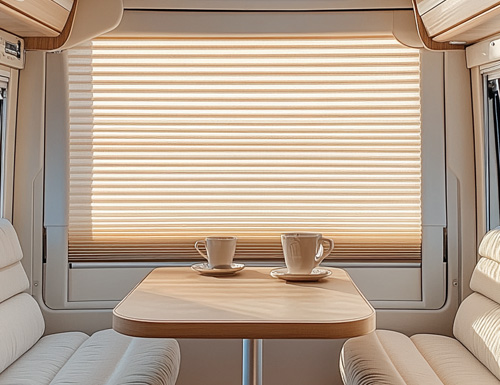
Day/Night Pleated RV Shades
A favorite for RV bedrooms and living areas. You get a light-filtering fabric for daytime and a blackout fabric for night, in one clean unit. Great when you want flexibility without changing products.
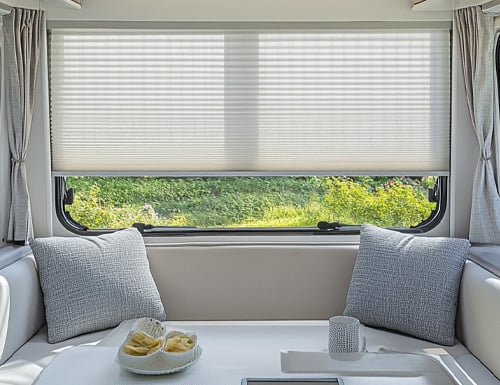
Pleated & Cellular RV Shades
Lightweight, tidy, and comfortable. Pleated shades soften light, while cellular styles add insulation that helps steady interior temps. They’re a smart choice when you travel through hot days, cool nights, and everything in between.
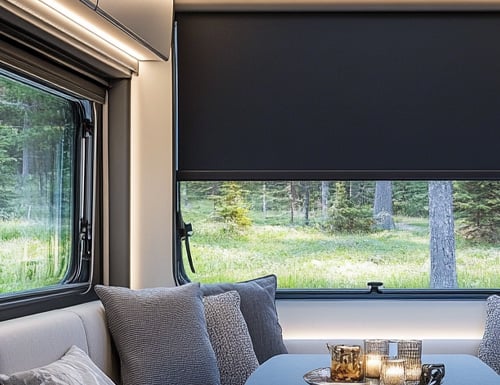
Roller RV Shades (Blackout or Solar)
Ideal for larger windows and slide-outs. Solar fabrics cut glare and reduce heat while keeping daytime visibility; blackout rollers give maximum darkness for sleep and movie nights. Roller shades also keep a simple, modern look.
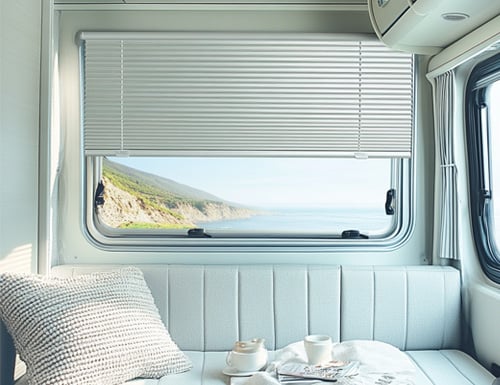
RV Mini Blinds (Aluminum)
A practical pick for kitchens, bathrooms, and high-use areas. Aluminum mini blinds are easy to wipe down and handle moisture better than many fabrics, while still giving you adjustable light control.
Cordless & Motorized Options
Cordless styles keep tight RV walkways cleaner and safer. Motorized options add convenience for hard-to-reach windows or wide spans, providing smooth, consistent operation.
To make choosing easy, here’s a quick guide:
- Want maximum darkness? Choose blackout roller shades or the blackout layer on day/night shades.
- Want daytime visibility with less glare? Choose solar roller shades.
- Want insulation and comfort? Choose cellular shades.
- Need wipe-clean durability? Choose aluminum mini blinds.
Not sure what fits your rig? Tell us your window type, mounting depth, and goals, and we’ll point you to the best match before you order.
All options come in RV-friendly sizes, with hardware chosen for a secure hold. Once installed, they stay aligned, operate smoothly, and look like they belong from day one to year five.
Best Uses by RV Area (Pick by Room, Not Just Style)
RV window treatments work best when they match how you actually use each area of your rig. Instead of picking one style for every window, most owners get better comfort (and fewer regrets) by choosing by room and window size.
Bedroom: If you sleep lightly or start early, blackout matters. Day/night pleated shades are popular because the blackout layer blocks morning light while the sheer layer still gives daytime privacy. For the darkest result, blackout roller shades are hard to beat.
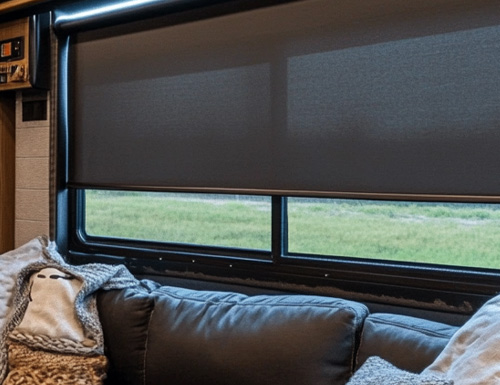
Living area: This is where glare control and flexible light are the priority. Light-filtering pleated or cellular shades keep the space bright without feeling exposed. Solar roller shades are great on big side windows because they cut harsh sun while letting you see outside.
Kitchen & bathroom: Wipe-clean durability matters here. Aluminum mini blinds are practical for moisture, cooking splatter, and high-use windows. If you prefer fabric, choose materials that tolerate humidity and keep airflow in mind.
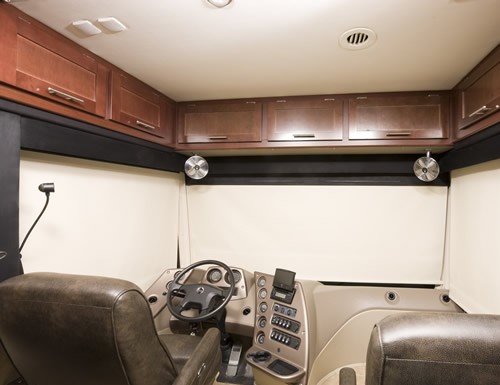
Slide-outs: Clearance is everything. A shade that sticks out too far can rub, bind, or catch when the slide moves. Low-profile roller shades and properly sized day/night shades are common choices—just confirm mounting depth and any trim or valance limitations.
Entry door and narrow windows: These spots benefit from simple operation and sturdy hardware. Compact mini blinds or slim roller shades keep things tidy and don’t snag in tight walkways.
If you’re unsure, start with the windows that bother you most—heat in the afternoon, headlights at night, or early morning sun—and build from there.
Why Blinds Chalet Is the RV Blinds & Shades Expert (Nationwide)
Blinds Chalet is built around one simple idea: RV windows deserve purpose-built solutions, not “close enough” home products. RV frames are shallower, trim is tighter, and everything you install has to keep working after miles of vibration, temperature swings, and daily open-and-close use.
Our team focuses on the details that usually get missed—mounting depth behind valances, latch clearance, hardware that stays secure, and fabrics that make sense for travel. We help you choose between day/night, roller, pleated, cellular, and mini blind options based on your goals (sleep darkness, daytime visibility, glare reduction, or privacy), not just what looks good online.
When you order, you’re not left guessing. You’ll get clear measurement guidance, straightforward recommendations, and answers from people who actually understand RV layouts—slide-outs, narrow walkways, awkward window shapes, and the little quirks that vary from one rig to the next.
We also design for practical ownership: easy cleaning, parts that can be swapped, and options that won’t feel flimsy after a season. Orders are packaged to arrive ready, with hardware and instructions organized so installation is quick, even in tight spaces.
Ordering FAQs
Do you help me choose the right style for my RV?
Will these work for motorhomes, fifth wheels, and travel trailers?
What if my RV windows aren’t perfectly square?
Why RV Owners Choose Blinds Chalet (Real-World Reasons)
RV owners don’t just want something that looks good on day one—they want window treatments that still work after thousands of miles. Here’s why many customers stick with Blinds Chalet:
- Fit-first ordering: We build to your measurements, so you’re not fighting gaps, crooked installs, or products that “almost” match the opening.
- RV-ready options: We recommend styles that make sense for shallow depth, tight trim, and real clearance issues around latches and valances.
- Better light control: From solar fabrics that cut glare to blackout layers that help you sleep, you can choose the level of privacy and darkness you actually want.
- Cleaner installs: Hardware is selected to stay secure and keep operation smooth, reducing annoying movement and rattle during travel.
- Simple decision help: If you’re torn between day/night, roller, pleated, or mini blinds, we’ll narrow it down based on the room, the window size, and your goals.
- Clear guidance: Measuring instructions are straightforward, and we point out common mistakes before they cost you time.
- Nationwide shipping: Whether you’re parked at home, at a campground, or prepping for a trip, your order ships directly to you.
- Support that follows through: If you have a question before or after purchase, you can reach a real person who understands RV window challenges.
The end result is a finished look, comfortable light control, and shades that feel like they belong in your rig.
How to Measure RV Windows (Step-by-Step, No Guessing)
Measuring RV windows isn’t hard, but it does require a little precision. RV openings can be slightly out of square, and trim or latches can steal space. Use a steel tape measure, write numbers down, and don’t rely on the old shade size unless you know it was correct.
- Decide inside mount vs outside mount
Inside mount sits within the window frame for a cleaner look, but it needs enough depth. Outside mount can cover light gaps and works when the frame is shallow. - Measure width in three places
Measure the inside width at the top, middle, and bottom. Use the smallest number. This helps prevent binding if the opening isn’t perfectly even. - Measure height in three places
Measure the inside height on the left, center, and right. Again, use the smallest number. - Check mounting depth
Measure how much flat depth you have behind trim or a valance. Depth is often the deciding factor between shade styles. - Note obstructions
Look for window cranks, latches, handles, speakers, and curved corners. These can affect where brackets sit and how far the shade can drop. - Confirm clearance for slide-outs
If the window is on a slide, make sure the shade won’t rub when the slide moves. Low-profile choices are usually best here.
Common measuring mistakes to avoid: rounding up “because it’s close,” measuring only once, ignoring depth, and forgetting that trim can narrow the usable opening.
Quick checklist before you order: tape measure, notepad, photos of the window area, and a note of your goal (blackout, glare reduction, privacy, or all three). If anything looks odd, send the measurements and a quick photo to our team—we’ll help you confirm the best fit before you buy.
Outside mount measuring (if you choose it): measure the full area you want covered, not just the glass. Many RV owners add a small overlap on each side to reduce light leakage, especially in bedrooms. Measure the width you want the shade to span, then the height from where the top brackets will sit to where you want the shade to stop.
If you’re replacing an old unit, check how it was mounted. A shade can be “right sized” but installed too high, too low, or too close to a latch. Also verify whether the frame is metal, wood, or composite so you can use the correct fasteners and avoid stripping thin material.
Before placing the order, do one last sanity check: compare your smallest width to the largest width. If the difference is noticeable, your opening may be out of square—an inside mount will need the smaller number, and you may want a style that tolerates slight variation. When in doubt, measure twice on a second day. It’s the fastest way to avoid a costly redo.
Measuring FAQs
Should I use the smallest or largest measurement?
What if I don’t have enough depth for an inside mount?
Can I measure based on my old RV shade size?
Do slide-out windows need anything special?
Install Overview: Easy DIY Steps That Actually Work in an RV
Installing RV blinds or shades is usually a straightforward DIY project, especially if you take five minutes to prep and verify clearance first. Most installs take 20–45 minutes per window, depending on the style and whether you’re replacing existing brackets.
Tools you’ll typically need: a tape measure, pencil, drill/driver, small level, and the right bit for the screws provided. If you’re mounting into thin trim, pre-drilling helps prevent splitting and stripped holes.
Step-by-step overview:
- Dry-fit and mark bracket locations. Hold the headrail or shade where it will sit, confirm it’s centered, and mark your screw points.
- Check for obstructions. Open and close the window latch, crank, or handle to make sure nothing hits the shade path.
- Confirm depth and angle. RV walls can be slightly curved; keep brackets aligned so the shade runs straight.
- Pre-drill small pilot holes, then mount brackets snug (not over-tight).
- Snap or screw the shade into the brackets per the product style.
- Test operation slowly. Raise/lower a few times and verify it locks, tracks, and clears trim.
- Add hold-downs if needed. For some rigs, especially on doors or high-vibration areas, hold-down brackets keep the bottom stable while driving.
If you’re reinstalling after a replacement, don’t assume the old bracket spacing was correct—measure again and fix any crooked mounting before you tighten everything down.
Pro tip: if you’re choosing between inside and outside mount, install is often easier when you match the mount style to the RV’s trim. Inside mounts look cleaner, but only if you have enough flat depth; outside mounts can hide light gaps and avoid latch interference. Either way, avoid using only adhesive strips for a primary mount—road vibration will eventually win. When in doubt, take a quick photo of the window area before drilling so you can put everything back exactly where it belongs.
Installation FAQs
Do I need hold-down brackets for RV shades?
Should I choose inside mount or outside mount for easier installation?
Can I reuse old RV blind brackets?
Heat, UV, Privacy: Choose the Right Opacity for Your RV
Choosing the right fabric isn’t just about looks—it’s about how you want your RV to feel at 2 p.m. and at 2 a.m. Most RV owners are trying to solve one of four problems: heat, glare, privacy, or sleep.
Solar shades are the “daytime comfort” pick. They reduce glare and cut down on harsh sun while still letting you see out. They’re ideal for big side windows where you want to keep the view but stop squinting. They also help protect upholstery from fading without turning the RV into a cave.
Light-filtering shades brighten the space while softening the light. You’ll still see shapes and movement outside at night if lights are on inside, so they’re best when you want a cheerful interior and decent daytime privacy.
Room-darkening fabrics are a middle ground. They block a large amount of light and improve privacy, but they may still allow a faint glow around the edges, depending on mounting style and overlap.
Blackout shades are the “sleep-first” option. They’re popular in motorhome bedrooms, bunks, and media areas because they dramatically reduce light and help stabilize temperature. For the best blackout result, pair the fabric with the right mount: outside mount with a small overlap reduces edge light, while inside mount looks cleaner but can leak more along the sides.
A quick way to decide:
- If glare ruins your daytime comfort, start with solar.
- If you want privacy without losing brightness, choose light-filtering.
- If naps and early mornings matter, go room-darkening or blackout.
- If you want flexibility in one window, day/night shades give you both.
Also think about direction and parking habits. If you often park with the sun hitting one side all afternoon, a higher-opacity fabric can noticeably reduce interior heat buildup. If you chase cooler weather and spend more time in shaded sites, you may prefer lighter fabrics that keep the cabin feeling open.
Cordless & Motorized Options: Cleaner, Safer, Easier in Tight Spaces
In an RV, cords can become a nuisance fast. Tight walkways, narrow bunks, and frequent in-and-out traffic make cordless operation a simple upgrade that keeps things clean and safe. Cordless shades also tend to stay neater when you’re moving, because there’s less dangling hardware to sway and tap against walls.
Motorization can be worth it when a window is hard to reach (over a dinette, behind a sofa, or up high), or when you’re covering wide spans and want consistent movement. It’s also handy if you like setting the same “privacy position” every evening. If you choose motorized, think through power and access: you want controls that are easy to use and a setup you can service without removing half the trim.
For most owners, the best approach is mixed: cordless for everyday windows, and motorized only where it genuinely improves comfort and convenience. The goal is simple operation without adding complexity you don’t need.
Cordless operation is also the easiest way to reduce snagging when kids, pets, or gear brush past the window area. If you travel with pets, fewer hanging cords means fewer tempting “toys.” For motorized setups, look for a way to pause mid-travel and confirm the shade is fully raised before driving, so it doesn’t bounce or crease. Store remotes in a consistent spot so you don’t have to hunt for them at night.
Cordless & Motorized FAQs
Are cordless RV shades safer?
When is motorization worth it in an RV?
Do motorized shades hold up while driving?
What to Expect (No Surprises)
Because RV blinds and shades are often custom-sized, the process is a little different than grabbing a standard box off a shelf. Once you place an order, it moves into production based on the measurements and options you selected. That’s why accurate measuring matters—custom work is built to fit the numbers you provide.
Before ordering, have three things ready: your final width/height, your mount type (inside or outside), and any notes about obstructions like latches or valances. If you’re unsure, it’s better to ask first than to guess.
Shipping is packaged to protect rails, fabrics, and hardware in transit. When your order arrives, open it carefully, verify parts against the packing list, and keep the box until installation is complete. If something looks off, contact us right away with photos so we can troubleshoot quickly.
Lead times vary by product type and season, but we’ll give you a clear expectation up front so you can plan your upgrade before a trip. For returns or exchanges, follow the instructions provided with your order; custom-sized items may have different eligibility than stock accessories. Our goal is simple: no surprises—just a smooth order-to-install experience.
If you’re shipping to a campground or temporary address, double-check the recipient name and delivery instructions so the package isn’t turned away. As soon as tracking shows delivered, inspect for transit damage and report it promptly.
Shipping FAQs
Are custom RV blinds and shades returnable?
What should I do if my package arrives damaged?
Can I ship to a campground or temporary address?
Real RV Installs, Real Results
Seeing RV blinds and shades in real interiors makes choosing easier. That’s why we keep our gallery focused on practical installs: bedrooms with true blackout coverage, living spaces that cut glare without killing the view, and slide-out windows where low-profile mounts prevent rubbing.
Look for details in the captions—mount type, window location, and the fabric level used—so you can compare your setup to something similar. If you’re replacing an older factory unit, pay attention to how the headrail sits behind trim and whether the bottom is stabilized for travel.
You’ll also find customer photos that highlight the “little wins”: fewer light gaps at sunrise, a cooler cabin in direct sun, and shades that stay aligned after long drives. If you have your own before-and-after, send it in. Real rigs, real lighting, and real usage help other owners choose with confidence.
Fast Help, Clear Ordering, Nationwide Shipping
Blinds Chalet serves motorhome and RV owners nationwide through our online ordering and dedicated support team. If you found us through our Google Business Profile, you can use it to confirm business hours, read recent customer feedback, and get quick directions to our customer service options.
Need help before ordering? Call or message us with your window photos, mounting depth, and the room you’re upgrading (bedroom, living area, slide-out, door, or bath). We’ll help you narrow down the right style, opacity, and mount type so your order fits the first time.
For the fastest support, have your measurements ready: inside width and height measured in three places, plus any notes about latches or valances. We’ll walk you through the next step and get you on track to a clean install.
RV Window Blinds & RV Window Shades
Here are the most common questions RV owners ask when shopping for RV window blinds and RV window shades.
What are the best blinds or shades for RV windows?
Are RV blinds different from regular home blinds?
How do I measure RV windows for custom shades?
Should I choose inside mount or outside mount?
What’s the difference between solar, light-filtering, room-darkening, and blackout?
Do day/night shades really block light at night?
Will my shades rattle while driving?
What styles work best on slide-out windows?
Can I replace just the fabric in my old RV shade?
Can I replace just one damaged RV shade to match the others?
How long does installation take?
What tools do I need to install RV blinds or shades?
How do I clean RV blinds and shades?
Do cordless shades make sense in an RV?
Get the Right Fit, Then Hit the Road
Ready to upgrade your RV windows without guessing or settling for “close enough”? Shop Blinds Chalet for custom RV window blinds and RV window shades built for your motorhome to your exact measurements and shipped nationwide.
If you want the fastest path to a perfect fit, start with measuring help. Send your window photos, mounting depth, and the room you’re upgrading, and we’ll point you to the best style—day/night, roller, pleated/cellular, or mini blinds—based on your goals for glare, privacy, and sleep.
* Production lead times are only an estimate and does not apply to any colors that are out of stock. Production begins the following business day after ordering. Please allow additional time for shipping.